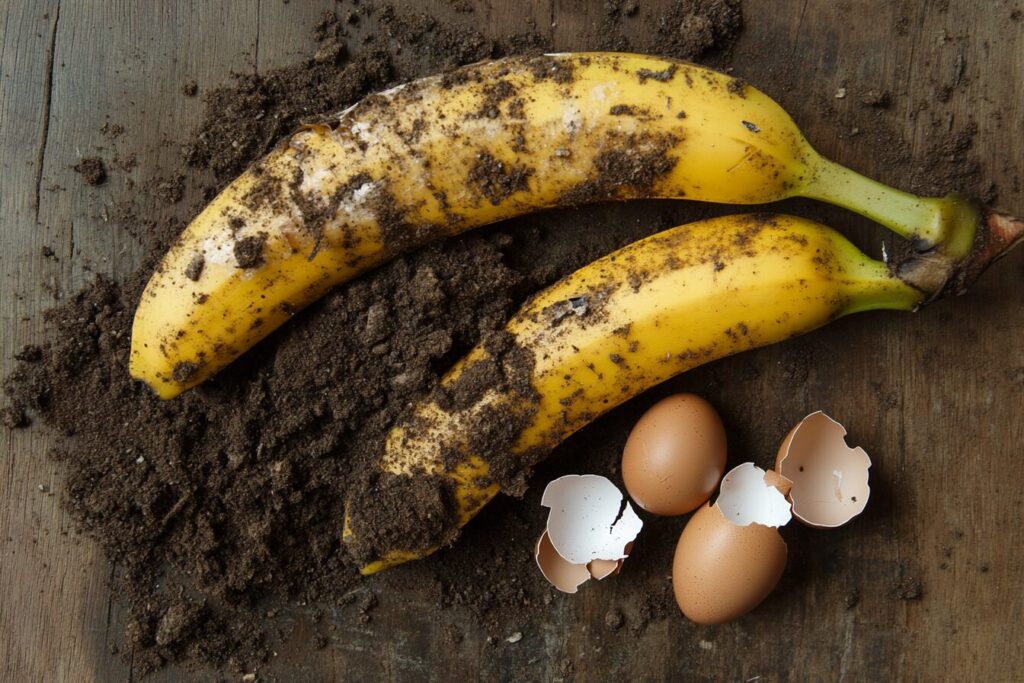
Save money, reduce waste, and grow your own food—right from the scraps!
Imagine turning your kitchen waste into a thriving mini garden. Sounds like magic? It’s not—it’s simply smart, sustainable living. Whether you’re trying to cut down on grocery bills or dabble in indoor gardening, there are plenty of foods you can regrow from kitchen scraps with minimal effort and zero gardening experience.
In this guide, we’ll show you 15 everyday foods that you can regrow from leftovers—plus how to do it, what to expect, and tips for success. Whether you live in a house with a backyard or a small apartment with a sunny windowsill, you can get started today.
Why Regrow Food from Scraps?
Growing your own food from scraps isn’t just a fun science experiment—it offers real benefits:
- Save money: Reuse what you already bought instead of rebuying it
- Reduce food waste: Fewer veggie ends and stems in the trash or compost
- Eco-friendly: Lower your carbon footprint by reducing store-bought packaging
- Self-sufficient: Grow your own herbs, veggies, and greens year-round
Plus, growing foods you can regrow from kitchen scraps can be a fun activity for kids, a relaxing hobby for adults, and a step toward building a more sustainable kitchen.
We are a participant in the Amazon Services LLC Associates Program, an affiliate advertising program designed to provide a means for us to earn fees by linking to Amazon.com and affiliated sites.
Getting Started: What You’ll Need
Before we dive into the full list, here are a few basics you’ll want on hand:
- A sunny windowsill (south-facing is best)
- Clear jars or small containers for rooting
- Potting soil and small pots
- Sharp kitchen knife or shears
- Fresh water (change every 1–2 days)
Let’s get growing!
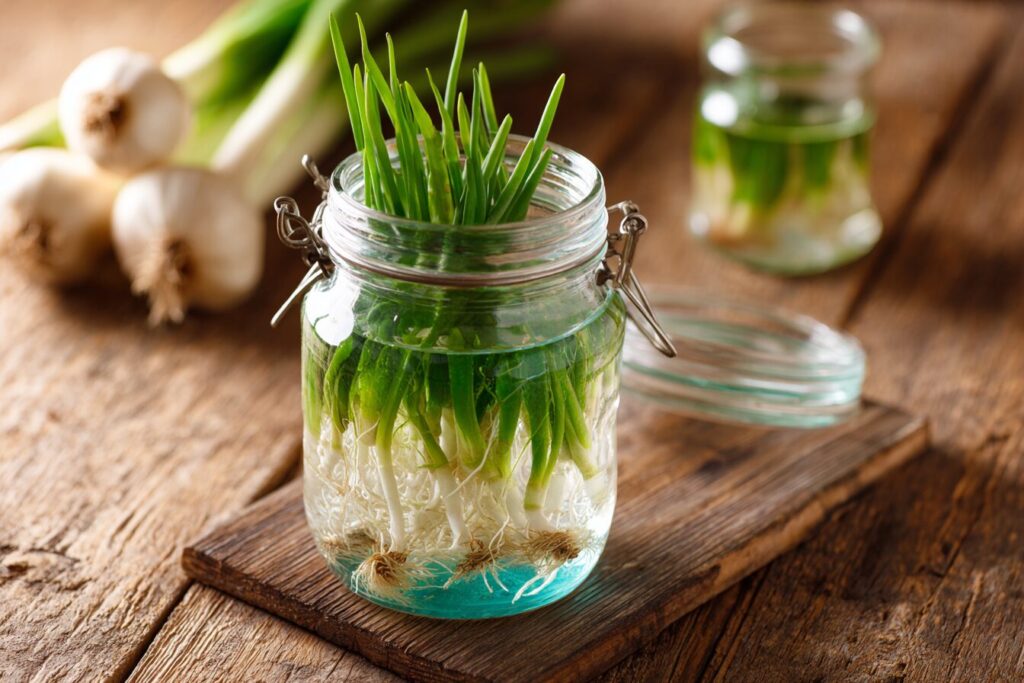
1. Green Onions
Green onions (also known as scallions) are one of the easiest and most rewarding foods to regrow from kitchen scraps. Not only are they fast-growing, but they also regrow multiple times from the same roots, making them a go-to for beginner gardeners and budget-conscious cooks alike.
How to Regrow Green Onions in Water
- Cut the green tops off your store-bought green onions, leaving about 2 inches of the white root base intact.
- Place the root ends in a small jar or glass with just enough water to cover the roots—but not the top of the bulbs.
- Set the jar on a sunny windowsill, ideally south- or east-facing, where it gets 6–8 hours of natural light per day.
- Change the water every 1–2 days to prevent mold or bacteria from forming.
- Watch for regrowth! Within 2–4 days, you’ll see green shoots emerging from the center. They can grow up to 3–5 inches in a week.
- Once the green shoots are long enough, snip off what you need with clean kitchen scissors and let them keep growing.
Pro tip: Rotate the jar occasionally so all sides get sunlight evenly for straight, healthy growth.
Transition to Soil for Stronger Growth
If you want continuous regrowth for weeks or even months, transplant your water-rooted onions into a small container of soil after 7–10 days:
- Fill a 4–6 inch pot with well-draining potting mix, leaving an inch of space at the top.
- Make small holes and gently place the green onion roots into the soil, just deep enough to keep them upright.
- Water gently but thoroughly, making sure the soil stays moist but not soggy.
- Keep the pot on a sunny windowsill or balcony and snip greens as needed—just above the base, so they can regrow again and again.
Recommended Product:
To simplify your windowsill gardening, consider a compact indoor herb planter like this:
👉 Indoor Windowsill Herb Planter Box with Drainage Tray – Set of 3
Perfect for green onions, basil, and other kitchen regrow projects. Comes with drainage trays and fits right on a standard windowsill!
Green onions regrow fast, require minimal care, and keep producing—making them one of the most practical and budget-friendly additions to your regrowth kitchen garden.
2. Romaine Lettuce
Don’t toss that romaine core—turn it into a living plant! Romaine lettuce is one of the easiest leafy greens to regrow from scraps, and it starts sprouting in just a few days. While you won’t grow a full grocery-store-sized head, the tender new leaves are perfect for salads, wraps, and sandwich toppings.
How to Regrow Romaine Lettuce in Water
- After using your romaine, save the base (about 2–3 inches from the bottom).
- Place the core in a shallow bowl or dish with about ½ inch of water, cut side up and root side down.
- Set it on a sunny windowsill where it gets 6–8 hours of indirect light daily.
- Mist the top with water once or twice a day to keep it moist and encourage leaf growth.
- Change the water every other day to keep it fresh and prevent rotting.
- In 5–7 days, small green leaves will begin growing from the center of the core. You might also see tiny roots forming at the base.
Harvest Tip: Once the new leaves are 3–4 inches tall, snip them off with clean scissors. You can often get a second or third harvest before growth slows.
How to Transplant to Soil (Optional but Recommended)
While regrowing in water is fun and easy, transferring your romaine to soil after the first week helps strengthen the plant and extend its harvest life:
- Prepare a small pot or planter with 4–6 inches of nutrient-rich potting soil.
- Gently plant the lettuce base, root side down, leaving the growing center exposed.
- Water thoroughly, then place the pot in a sunny spot indoors or outside.
- Keep the soil evenly moist, not soggy. Within a week, new leaves will thicken and grow taller.
Romaine grown in soil tends to develop better flavor and structure than those kept in water long-term.
Budget-Friendly Gardening Upgrade:
Want a no-mess setup for your regrowing greens?
👉 Self-Watering Herb and Veggie Planters with Clear Water Windows
These compact containers helps romaine and other greens thrive indoors with less watering and easy monitoring—perfect for beginners regrowing kitchen scraps!
Budget-Friendly Tip:
You can usually regrow romaine lettuce 2–3 times before the leaves lose their crispness and flavor. After that, compost the base—or plant a new one!
Romaine lettuce is fast, fuss-free, and a fun way to introduce your family to regrowing food from scraps. Even if you only harvest a handful of leaves each time, it’s a satisfying step toward zero-waste living—and one less thing on your grocery list.
3. Celery
Celery is another kitchen staple that’s incredibly easy to regrow from scraps. Instead of tossing the base, you can turn it into a brand-new plant that produces fresh stalks and leafy tops. While regrown celery may be thinner than store-bought bunches, the flavor and freshness are unbeatable—plus, it’s a great way to reduce food waste.
How to Regrow Celery in Water
- After using your celery, save the bottom 2 inches of the stalk cluster (the part with the root base).
- Place the base in a shallow dish of water, cut side facing up and root side down.
- Put the dish on a bright windowsill that gets 6+ hours of sunlight daily.
- Change the water every 1–2 days to keep it clean and prevent mold or bacteria.
- Watch for growth! In 5–7 days, you’ll see small yellow-green leaves and stalks sprouting from the center.
- Continue growing in water for up to 10 days, misting the top lightly if the edges begin to dry out.
The center leaves can be harvested early for garnish, or let them grow thicker for more usable celery stalks.
How to Transplant Celery to Soil for Best Results
Water is great for getting started, but for a fuller, longer-lasting harvest, move your celery to soil once the stalks reach about 2 inches tall:
- Fill a medium-sized container (6–8 inches deep) with well-draining potting soil.
- Dig a small hole and place the celery base into the soil, covering just enough to stabilize it while keeping the growing center exposed.
- Water thoroughly after planting, and place the pot in a sunny location indoors or outdoors.
- Keep the soil consistently moist, but not soggy—celery loves hydration but hates wet feet.
- Feed every couple of weeks with compost or a diluted organic fertilizer to encourage steady growth.
Harvest Tip: You can begin harvesting outer stalks when they reach 6–8 inches tall by cutting them near the base—leave the inner stalks to keep growing.
Recommended Product:
Make transplanting simple with this handy raised indoor planter:
👉 Elongated Self-Watering Indoor Garden Bed – Perfect for Lettuce & Celery
Its self-watering reservoir and compact design make it ideal for windowsill regrowing projects like celery and romaine, especially if you’re short on space or forgetful with watering.
Bonus Use: Don’t Toss Those Celery Leaves!
The leafy tops are packed with flavor and can be used in:
- Soups and stocks
- Egg salad and tuna salad
- Herbaceous pestos or chimichurri
- Stir-fries and sautés
Growing celery from scraps is satisfying, sustainable, and surprisingly simple. It’s a great project for kids, frugal foodies, and anyone looking to grow more of what they eat—right on the windowsill.
4. Garlic
If you’ve ever found a garlic clove sprouting in your pantry, don’t toss it—plant it! Garlic is one of the easiest and most rewarding foods to regrow at home. Not only will you get flavorful green shoots known as garlic scapes, but if you’re patient, you’ll grow an entire new bulb underground.
You can grow garlic indoors for scapes or plant it outdoors for full bulbs. Either way, it’s a win for your wallet and your flavor-packed meals.
How to Regrow Garlic at Home
- Choose a sprouted garlic clove (you’ll see a green shoot emerging from the top). If it hasn’t sprouted yet, it still may grow—just avoid soft or moldy cloves.
- Plant the clove in soil, sprout-side up, about 2 inches deep.
- Space multiple cloves 3–4 inches apart if planting in a pot or garden bed.
- Water thoroughly after planting and keep the soil consistently moist, but not soggy.
- Place your pot in a sunny location—garlic loves full sun, so aim for 6+ hours a day.
In 1–2 weeks, you’ll see green shoots breaking through the soil. These garlic scapes are edible and taste like a milder version of garlic with a hint of green onion.
Harvesting Garlic Scapes and Bulbs
- Garlic Scapes: Once shoots are 6–8 inches tall, snip them with clean scissors to encourage energy to go into bulb formation. Use scapes in stir-fries, eggs, soups, or even pesto!
- Garlic Bulbs: If grown in soil for several months (typically 6–8 months), the original clove will form a new bulb underground. The leaves will turn yellow and begin to fall over when it’s time to harvest.
- Gently loosen the soil and pull the bulb out.
- Cure the bulb by letting it dry in a cool, dry spot for 1–2 weeks before storing.
Best Planter for Indoor Garlic Growing:
👉 Deep Indoor Herb Planter Box with Drainage and Tray – Ideal for Root Veggies & Garlic
This deep container is perfect for growing garlic indoors year-round and comes with built-in drainage to prevent soggy roots.
Bonus Tips:
- Grow Multiple Stages at Once: Keep a few cloves growing indoors for scapes while planting others outside for bulbs.
- Use the Whole Plant: Garlic scapes are tender and flavorful—use them like chives or green onions. The bulb, of course, is a pantry staple.
- Overwinter Option: If you plant cloves in fall outdoors, they’ll go dormant in winter and grow into robust bulbs the following summer.
Regrowing garlic is a hands-off project that pays off in flavor and savings. Whether you’re harvesting quick scapes for recipes or letting bulbs mature underground, you’ll be amazed at how much value you can get from a single clove.
5. Potatoes
Those little “eyes” on your potatoes aren’t a sign it’s time to throw them out—in fact, they’re just the beginning of a brand-new plant. With a little prep and patience, you can regrow pounds of fresh, homegrown potatoes from a single spud right in your backyard, balcony, or even on a sunny porch in containers.
This is one of the most rewarding foods to regrow from kitchen scraps, both in yield and satisfaction.
How to Regrow Potatoes from Kitchen Scraps
- Look for potatoes with sprouting eyes (the small, bumpy spots that start to grow little shoots). You can use any variety—Yukon Gold, russet, red, or even purple.
- Cut the potato into chunks, making sure each piece has at least one or two eyes. Allow the cut pieces to air dry for 24–48 hours. This forms a protective callous over the cut surface and helps prevent rot when planted.
- Choose your planting container or garden bed. Potatoes love loose, well-draining soil with plenty of depth to grow downward.
- Plant the chunks about 4 inches deep, eyes facing up, and space them at least 12 inches apart. Cover with soil.
- Water thoroughly, and keep the soil evenly moist—not too wet, not too dry.
Potatoes thrive in full sun and need at least 6 hours of direct sunlight each day.
How to Grow Potatoes in Buckets or Grow Bags
If you’re short on space or want to avoid digging, growing potatoes in containers is incredibly easy:
- Start with 4–6 inches of soil at the bottom of a grow bag or 5-gallon bucket with drainage holes.
- Add your potato chunks, and cover them with 3 inches of soil.
- As the green stems grow, continue to “hill up” by adding more soil or compost around the base, covering the stems but keeping the top leaves exposed. This encourages the plant to grow more tubers along the buried stem.
- Repeat until the container is full, watering consistently and feeding with compost tea or organic fertilizer every couple of weeks.
- Harvest when the plant begins to yellow and die back—this means the potatoes are ready!
Recommended Product:
👉 Fabric Potato Grow Bags with Flap – 10-GallonD Breathable Planters
These grow bags are reusable, breathable, and come with a convenient flap for checking on your potatoes as they grow. Perfect for small-space gardening or patios!
Harvesting Tips
- For new baby potatoes, harvest about 8 weeks after planting while the plant is still green and flowering.
- For larger mature potatoes, wait until the plant fully dies back. Let the tubers cure in a cool, dry place for 1–2 weeks before storing to toughen the skin and improve shelf life.
Storage Tip: Keep harvested potatoes in a cool, dark, well-ventilated spot—never in the fridge, which turns starch into sugar.
Bonus Tip: Regrow Sweet Potatoes, Too!
While traditional potatoes grow from chunks, sweet potatoes grow from slips (sprouts that develop from a whole sweet potato placed in water). Once slips grow 4–6 inches long, they can be snipped off and planted for a new vine full of edible roots.
Growing potatoes from scraps is more than frugal—it’s fun, productive, and incredibly satisfying. Whether you’re a backyard homesteader or an apartment gardener, a bucket of sprouting spuds can feed your family for weeks.
6. Sweet Potatoes
Sweet potatoes don’t regrow like regular potatoes—from chunks or eyes—but from slips, the leafy green sprouts that grow from a whole sweet potato. These slips are your ticket to regrowing a full vine that will produce even more sweet potatoes under the soil.
This method is perfect for indoor starts during cooler months and outdoor planting once the weather warms up.
How to Regrow Sweet Potatoes from Slips
- Select a healthy sweet potato, preferably organic (non-organic ones may be treated to inhibit sprouting).
- Insert toothpicks into the sides of the sweet potato and suspend it over a glass or jar, with the bottom half submerged in water.
- The bottom is usually the more blunt or rounded end.
- Place the jar in a sunny, warm location like a windowsill or under a grow light.
- Wait 1–2 weeks for leafy green slips to sprout from the top. Roots will also grow from the submerged end.
Propagating and Planting the Slips
- Once the slips reach 4–6 inches long, gently twist them off the potato.
- Place each slip in its own glass of water with the bottom submerged. In a few days, you’ll see white roots forming.
- When roots are about an inch or two long, transplant the slips into soil, spacing them 12–18 inches apart in a garden bed, raised bed, or container.
Sweet potatoes LOVE heat and sunshine—they need at least 6–8 hours of full sun daily and thrive in temperatures above 70°F (21°C).
Ideal Growing Conditions for Sweet Potatoes
- Soil: Loose, well-draining soil rich in organic matter. Avoid heavy clay soils which can restrict tuber development.
- Watering: Keep the soil evenly moist, especially during the first 30–40 days of growth. Once vines are established, reduce watering slightly to avoid rot.
- Feeding: Sweet potatoes benefit from compost-rich soil. Avoid high-nitrogen fertilizers which can lead to lots of vines but few tubers.
Harvesting and Storage
- Maturity Time: Sweet potatoes take about 90–120 days to mature. Harvest when the leaves begin to yellow or just before the first frost in fall.
- To Harvest: Gently dig under the vines with your hands or a garden fork to avoid damaging the tubers.
- Curing: Cure harvested sweet potatoes in a warm (85°F), humid place for 7–10 days. This sweetens the flavor and toughens the skin for long-term storage.
- Storage: After curing, store in a cool (55–60°F), dark location with good ventilation for up to 6 months.
Bonus Growing Ideas
- Grow Sweet Potato Vines Indoors as Decor: Even if you don’t plan to harvest, the slips can become lush trailing houseplants! Just keep the vine trimmed and in a bright spot.
- Vertical Growing Option: Trellis the vines in containers or raised beds to save space and reduce pests.
Regrowing sweet potatoes from scraps is a fun, family-friendly way to get more out of your grocery store produce. From sprouting slips in your kitchen window to digging up beautiful tubers months later, this project is a blend of science, sustainability, and satisfaction.
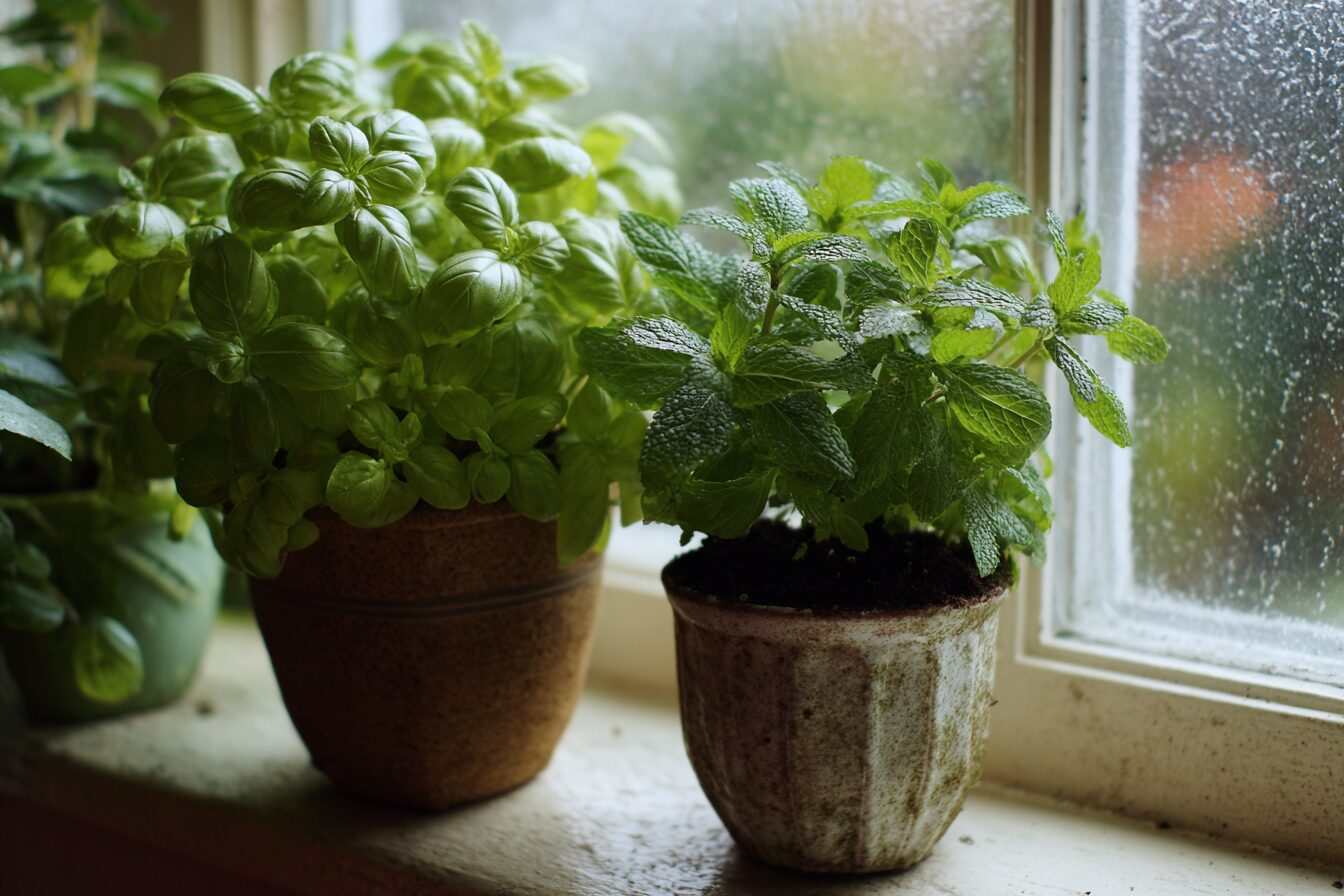
7. Basil
Fresh basil is a must-have for anyone who cooks from scratch—it brings vibrant flavor to pasta, sauces, soups, and salads. Luckily, it’s one of the easiest herbs to regrow from kitchen cuttings, and with a little love, you can enjoy a never-ending supply right from your windowsill.
Even if you’ve only got a few sprigs leftover from the store, you can multiply your basil plants at no extra cost.
How to Regrow Basil from Cuttings
- Select healthy basil stems that are about 4–6 inches long and free of flowers or signs of disease.
- Snip the stem just below a leaf node (the bump where leaves grow from the stem).
- Remove the bottom leaves, leaving only the top 2–4 leaves.
- Place the stem in a glass of water, ensuring the lower portion is submerged and the leaves stay above the waterline.
- Set the glass in a sunny spot like a kitchen windowsill.
Basil loves warmth and sunlight. Aim for 6+ hours of indirect light per day while the cuttings root.
Root Development and Transplanting
- In 5 to 10 days, you’ll begin to see roots sprouting from the stem base.
- Once the roots are 1–2 inches long, you can plant the basil in soil, either in a pot or directly in a garden bed.
- Choose a well-draining container if growing indoors, and water consistently to keep the soil moist but not soggy.
Recommended Product:
👉 Self-Watering Herb Garden Planter with Grow Light – Perfect for Indoor Basil
This indoor planter is ideal for keeping basil happy year-round. It includes built-in lighting and self-watering tech, making it great for beginners or small kitchens.
Care Tips for Healthy Basil Plants
- Pinch off flower buds as soon as they appear. This helps the plant focus its energy on leaf production instead of going to seed.
- Harvest often by snipping just above a leaf pair. Regular trimming makes the plant bushier and more productive.
- Rotate your pot weekly to ensure even sunlight exposure and prevent your basil from getting leggy.
- Feed with diluted organic fertilizer every 2–4 weeks during the growing season.
Bonus: Regrow Basil Indoors All Year Long
- Start a new round of cuttings every few weeks for a rotating harvest.
- Propagate extras to give as gifts—a rooted basil cutting in a cute mason jar makes a thoughtful, budget-friendly present.
- Grow multiple varieties like Genovese, Thai, or Purple Basil for unique flavor twists and visual interest.
Regrowing basil is a flavorful way to save money and reduce waste while elevating your home-cooked meals. Whether you’re blending up pesto or tossing fresh leaves on top of a homemade pizza, nothing beats the taste of homegrown herbs—especially when they started as scraps!
8. Mint
Mint is one of the most satisfying and low-effort herbs you can regrow from kitchen scraps. With just a few sprigs and a glass of water, you can propagate this fast-growing herb for an endless supply of cooling flavor. It’s aromatic, versatile, and nearly foolproof—perfect for beginner gardeners or busy home cooks.
Whether you love mint for refreshing teas, zesty salads, or homemade desserts, having it fresh and on hand makes all the difference.
How to Regrow Mint from Cuttings
- Start with healthy, unbruised mint stems (4–6 inches long) with at least a few sets of leaves.
- Remove the lower leaves to expose 2–3 inches of bare stem.
- Place the stems in a glass of water, making sure only the stem is submerged, not the leaves.
- Put the glass in a bright location, like a kitchen windowsill with indirect sunlight.
- Change the water every 2–3 days to prevent slime or rot.
In 5 to 10 days, roots will begin to appear. Once they’re a couple inches long, your mint is ready to be transferred to soil.
Transplanting Mint for Long-Term Growth
- Use a container with drainage holes to prevent soggy roots (mint doesn’t like to sit in waterlogged soil).
- Fill the pot with a lightweight potting mix, plant the rooted cutting, and water it well.
- Keep the soil consistently moist but not soaking wet.
Important tip: Mint spreads aggressively in gardens and can quickly take over. That’s why it’s best to grow it in a pot—even outdoors—to keep it contained.
Recommended Product:
👉 Large Outdoor Herb Planter Box with Trellis & Wheels – Ideal for Spreading Herbs Like Mint
This container gives mint plenty of room to grow while keeping it from invading your garden. The built-in trellis is great if you’re growing other herbs alongside it.
How to Use Fresh Mint
Mint isn’t just for mojitos—here are a few tasty, budget-friendly uses:
- Herbal teas: Steep a few leaves in hot water with lemon and honey.
- Salad toppers: Finely chop and mix with cucumber, tomato, and feta.
- Frozen treats: Blend into dairy-free ice creams or freeze into ice cubes with berries.
- Savory sauces: Add to chimichurri, tzatziki, or mint yogurt dip.
Mint Care and Harvesting Tips
- Harvest frequently to keep the plant bushy. Always snip above a leaf pair to encourage branching.
- Rotate the pot every few days for even sun exposure.
- Avoid over-fertilizing—too much nitrogen will make mint leggy with weak flavor.
- Bring pots indoors in cooler weather to grow year-round.
Bonus: Regrow Mint Year-Round
- Keep one pot on the windowsill and another on your porch or balcony.
- Start new cuttings monthly to always have young, flavorful plants.
- Propagate extras and gift small mint planters to friends and neighbors—it’s a frugal and fragrant way to spread the joy of gardening!
Mint is one of those magical herbs that pays you back over and over again. From one small sprig, you can grow enough to flavor months of meals, drinks, and desserts—saving money while savoring better-tasting dishes.
9. Carrot Tops
While it’s true you can’t regrow a whole new carrot root from a carrot top, what you can regrow is surprisingly useful: the leafy green carrot tops that sprout from those leftover stubs. These greens are not only edible but also packed with nutrients—perfect for whipping into homemade pestos, tossing into salads, or using as a bright garnish.
Instead of tossing those tops into the compost, turn them into a mini windowsill crop!
How to Regrow Carrot Tops from Scraps
- Cut about 1–1.5 inches off the top of a fresh carrot (the part where the greens would grow from).
- Place the cut top in a shallow dish or saucer with just enough water to cover the bottom of the carrot.
- Set the dish in a sunny spot, like a kitchen windowsill that gets 4–6 hours of light per day.
- Change the water every day or two to keep it fresh and prevent mold.
In 3–5 days, you’ll begin to see little green fronds sprouting from the top center. They’ll continue to grow over the next couple of weeks.
What to Do with Carrot Greens
Once the greens are a few inches tall, snip them with clean kitchen scissors and enjoy! They have a flavor similar to parsley with a slightly earthy edge.
Here are some tasty, budget-friendly uses:
- Carrot Top Pesto: Blend with olive oil, garlic, lemon juice, and sunflower seeds for a cheap, nut-free pesto.
- Soup Garnish: Sprinkle chopped carrot greens over soups and stews for a fresh herbal finish.
- Herb Substitute: Use them in place of parsley in tabbouleh, chimichurri, or salad dressings.
- Sautéed Greens: Lightly sauté with garlic and olive oil as a side dish or mix into scrambled eggs.
Optional: Transplant for Extended Harvest
If your carrot tops are growing well and you want a more decorative, longer-lasting mini herb garden:
- Plant the carrot top in soil once the greens reach about 2–3 inches tall.
- Use a shallow pot or repurposed container with good drainage.
- Keep it on your windowsill and harvest the greens as needed.
Although the root won’t regrow, the greenery can continue to grow and be trimmed for several weeks.
Recommended Product:
👉 Aerospring Indoor Hydroponic Tower with Pump and LED Grow Lights – Perfect for Regrowing Multiple Foods Without Soil
This vertical system is ideal for regrowing green onions, lettuce, basil, and more indoors. It circulates water and nutrients automatically, supports up to 27 plants, and includes full-spectrum grow lights—great for small spaces or low-light homes.
Carrot Top Regrowing Tips
- Use organic carrots if possible—non-organic varieties may be sprayed with growth inhibitors.
- Don’t overcrowd your dish; allow air circulation between multiple tops if regrowing several at once.
- Carrot greens don’t store well after cutting, so it’s best to snip as needed and use them fresh.
Carrot tops are a great example of how nothing needs to go to waste in a budget-conscious kitchen. With just a bit of water and sunshine, your veggie scraps can turn into flavorful, free herbs—and they look pretty on your windowsill, too!
10. Leeks
Leeks are a flavorful, hearty allium in the same family as green onions, garlic, and chives—and yes, you can regrow them from kitchen scraps! Their mild, onion-like taste makes them perfect for soups, casseroles, and sautés, and regrowing them at home is not only simple but also satisfying.
If you’ve got leftover leek ends, don’t toss them—turn them into a mini windowsill harvest instead!
How to Regrow Leeks from Kitchen Scraps
- Cut off the dark green leafy top and keep the white root end, leaving about 2–3 inches of the leek base intact.
- Place the leek base root-side down in a clear jar or small glass, with just enough water to submerge the roots but not the entire bulb.
- Set it on a bright windowsill that gets at least 6 hours of sunlight daily.
- Change the water every 1–2 days to keep it clean and oxygenated.
- Within 5–7 days, you’ll start to see new green shoots emerge from the center.
The green growth can reach several inches tall within a couple of weeks and will continue to grow if properly cared for.
Transplanting for Continued Growth
Once your leek has developed new roots and shoots (after about 7–10 days in water), you can transplant it to soil for a more vigorous, longer-lasting plant:
- Use a deep container with drainage holes and fill it with nutrient-rich potting soil.
- Plant the leek just deep enough to cover the white base, with the new green growth exposed.
- Keep the soil evenly moist and place the pot in a sunny location.
- Continue harvesting the green tops as needed by trimming above the base.
While regrown leeks may not reach full grocery-store size, they can still produce plenty of usable greens and tender stalks—especially if you’re just cooking for 1–2 people.
How to Use Regrown Leeks
Leeks are incredibly versatile and can be used much like onions or scallions. Here are a few delicious, budget-friendly ways to use them:
- Soups & Stews: Add thinly sliced leeks to potato soups, lentil stews, or chicken broth for depth of flavor.
- Egg Dishes: Sauté leeks with butter and add to scrambled eggs or quiches.
- Stir-Fries: Chop and toss into veggie stir-fries or noodle bowls.
- Casseroles: Mix with creamy sauces and veggies for hearty baked dishes.
- Savory Pies: Pair with mushrooms and cheese in galettes or pot pies.
Pro tip: Always wash your leeks thoroughly—even regrown ones—because dirt can get trapped between the layers.
Recommended Product:
👉 Self-Watering Herb Garden Window Planter – 3 Pot Set with Wicking System
Ideal for growing water-rooted veggies like leeks, green onions, and basil indoors without the mess. Great for sunny windowsills!
Regrowth Cycle Notes
- You can regrow leeks 2–3 times from the same base in water before they weaken.
- For continued regrowth, transferring to soil will result in sturdier, more productive plants.
- Snip only what you need, and allow the plant to keep regenerating!
Growing leeks from scraps is a clever, sustainable way to stretch your grocery dollar while building a mini kitchen garden. They’re low-maintenance, fast-growing, and elevate everyday meals with gourmet flavor—without costing you a dime after the first purchase!
11. Fennel
Fennel is a wonderfully aromatic vegetable with a distinctive sweet, anise-like flavor that enhances everything from roasted meats to fresh salads. If you’ve got leftover fennel bases from your kitchen, don’t toss them! You can regrow fresh, feathery fennel fronds right at home, making this a great zero-waste kitchen project.
How to Regrow Fennel from Kitchen Scraps
- Cut off the bulbous base of the fennel, leaving about 1 inch thick at the bottom (make sure it includes the root end).
- Place the base in a shallow bowl or jar filled with water, root side down.
- Set it in a sunny spot—a bright windowsill that gets at least 6 hours of indirect sunlight is ideal.
- Change the water every 1–2 days to keep it fresh and avoid bacterial growth.
- Within 7 to 14 days, you’ll see new green fronds (delicate feathery leaves) sprouting from the center of the base.
Transplanting Fennel for Continued Growth
For a longer-lasting harvest and fuller flavor, move your fennel to soil after the fronds appear:
- Fill a pot or container with well-draining potting soil.
- Plant the fennel base just deep enough to cover the roots and stabilize the bulb.
- Water thoroughly, and place the pot where it will receive bright light.
- Keep the soil evenly moist but not waterlogged.
- Harvest the feathery fronds by snipping what you need; they will continue to grow for several weeks.
Cooking with Regrown Fennel Fronds
Fennel’s delicate, licorice-like fronds add a lovely herbal note to many dishes:
- Salads: Chop and toss with citrus fruits, olive oil, and greens for a fresh, aromatic salad.
- Roasted meats: Sprinkle over roasted chicken, pork, or fish as a fragrant garnish.
- Soups & stews: Add near the end of cooking for a subtle anise flavor boost.
- Herb blends: Mix with parsley, dill, or tarragon in homemade dressings or sauces.
The bulbs themselves aren’t regrown from scraps, but these flavorful fronds bring a bright touch of fennel to your cooking with minimal effort.
Recommended Product:
👉 Herb and Vegetable Propagation Station with Water Reservoir
Perfect for regrowing fennel and other kitchen scraps. The clear container makes it easy to monitor root growth, and the compact size fits well on any windowsill.
Extra Growing Tips
- Fennel fronds grow best in moderate temperatures and plenty of light.
- Trim regularly to encourage bushier, healthier growth.
- Avoid letting the water sit too long without changing to prevent rot or odor.
Fennel is a gourmet ingredient that’s surprisingly simple to regrow from kitchen scraps. With just a little water, sunlight, and patience, you’ll have fresh fronds to brighten your meals and your windowsill garden.
12. Ginger
Ginger is a flavorful root that adds a spicy, warming kick to teas, stir-fries, and marinades. If you’ve got leftover ginger root with visible buds (small knobby eyes), don’t toss it! You can easily regrow ginger at home, turning a small scrap into a thriving plant that keeps producing fresh ginger for months.
Growing ginger is one of the most satisfying regrow-from-scratch projects because it’s low-maintenance and rewarding—and you don’t need a large garden space.
How to Regrow Ginger from Kitchen Scraps
- Select a healthy ginger root piece with visible “eyes” or buds—these look like small rounded bumps on the rhizome.
- Soak the ginger root in warm water overnight to encourage sprouting (optional but helpful).
- Plant the ginger piece about 2–3 inches deep in a wide, shallow pot filled with loose, rich potting soil.
- Place the pot in a warm, shaded spot—ginger prefers indirect sunlight and warmth (ideally 70–85°F).
- Water lightly but regularly to keep the soil moist but not soggy.
Growth and Care Tips
- Ginger grows slowly. Shoots will typically emerge in 2–4 weeks.
- As the plant matures, it will send up long, narrow green leaves and produce underground rhizomes (the edible ginger root).
- Ginger prefers humid environments, so misting the leaves occasionally can help.
- Avoid direct hot sunlight, which can scorch the leaves.
- Feed every 4–6 weeks with a balanced organic fertilizer or compost tea to encourage growth.
Harvesting Ginger
- You can begin harvesting young ginger rhizomes after about 3–4 months by carefully digging up small sections near the soil surface.
- For a larger harvest, wait 8–10 months until the leaves begin to yellow and die back naturally.
- Ginger stores well in the fridge or freezer—freshly harvested ginger is perfect for teas, stir-fries, smoothies, and baking.
Recommended Product:
👉 Herb Garden Planter Indoor Kit – Perfect for Ginger, Turmeric, and More
This kit provides the right container size, soil, and drainage needed to grow healthy ginger indoors, even if you don’t have a garden.
Bonus Uses for Fresh Ginger
- Brew fresh ginger tea with honey and lemon to soothe colds and digestion.
- Grate into stir-fries and marinades for vibrant flavor.
- Make homemade ginger syrup or candies using your fresh harvest.
Growing ginger from scraps is a rewarding, hands-off project that gives you fresh, flavorful root all year long. Perfect for gardeners, foodies, and anyone who loves cooking from scratch.
13. Lemongrass
Lemongrass is a fragrant, citrusy herb commonly used in Asian cooking, teas, and marinades. If you have leftover stalks from cooking, don’t toss them! You can easily regrow lemongrass at home, turning kitchen scraps into tall, lush plants that bring fresh flavor and aroma right to your windowsill or garden.
How to Regrow Lemongrass from Kitchen Scraps
- Save the bottom 4–6 inches of lemongrass stalks, especially the part with the bulbous root end.
- Place the stalks upright in a jar or glass of water, covering about 2–3 inches of the base.
- Set the jar in a bright, sunny window where it can get at least 6 hours of sunlight daily.
- Change the water every 2–3 days to keep it fresh and prevent mold.
- Within 2–3 weeks, roots will start to form at the base of the stalks.
Transplanting Lemongrass to Soil
Once roots are about 2 inches long:
- Fill a pot or garden bed with well-draining, nutrient-rich soil.
- Plant the rooted stalks about 1–2 inches deep, spacing multiple stalks about 6 inches apart.
- Water thoroughly after planting.
- Place the pot in a warm, sunny location—lemongrass thrives in temperatures between 70°F and 95°F.
- Keep soil consistently moist, but avoid waterlogging.
Cooking and Uses for Fresh Lemongrass
- Soups: Add bruised stalks to broths and soups for bright, lemony flavor.
- Marinades: Use finely chopped lemongrass in marinades for chicken, seafood, or tofu.
- Teas: Steep stalks in hot water with ginger and honey for a soothing herbal tea.
- Stir-fries: Slice thinly and toss into vegetable or meat stir-fries for a citrusy twist.
Recommended Product:
👉 Aeration Fabric Pots with Handles
These breathable grow bags provide excellent drainage and air circulation to promote healthy root development. The sturdy handles make them easy to move, even when full—ideal for growing root vegetables on patios, balconies, or small garden spaces.
Lemongrass Care Tips
- Lemongrass prefers full sun and warmth, so it’s ideal for sunny windowsills or outdoor patios.
- Fertilize monthly with a balanced organic fertilizer to keep the grass lush.
- Harvest by cutting stalks near the base once they reach 12 inches tall.
- In colder climates, bring pots indoors during winter or treat lemongrass as an annual.
Regrowing lemongrass from kitchen scraps is an easy, rewarding way to have fresh herbs ready whenever you need them. The vibrant citrus aroma and flavor will elevate your cooking and make your kitchen smell amazing.
14. Onion Bulbs
Onions are a kitchen staple, and if one starts sprouting, don’t throw it away—regrow it instead! This simple process allows you to get fresh onions from scraps, saving money and reducing waste. Both yellow and red onions work well for regrowing, giving you flavorful bulbs or green shoots for cooking.
How to Regrow Onions from Sprouting Bulbs
- Take an onion that has started sprouting green shoots—the bulb should be firm and healthy.
- Cut the onion in half, ensuring the sprouting side remains intact.
- Plant the sprouting side down in a pot or garden bed, covering with just a thin layer of soil (about half an inch).
- Water the soil thoroughly and keep it consistently moist but not soggy.
- Place the container in a sunny spot with at least 6 hours of direct sunlight daily.
Growth and Care
- Within a week or two, green shoots will grow taller.
- As the plant develops, new bulbs may start to form underground.
- You can harvest green onion tops anytime for use in salads, soups, and garnishes.
- For full-sized onions, let the bulbs mature for several months—until the tops turn brown and die back.
- After harvesting, cure the onions in a dry, well-ventilated place for a couple of weeks before storage.
Using Regrown Onions in the Kitchen
- Use fresh green shoots like scallions for garnishing soups, salads, or baked potatoes.
- Harvest newly formed bulbs for milder, homegrown onions.
- Add flavor to sautés, stews, and roasted vegetables with your fresh onions.
- Regrown onions have a sweeter, fresher flavor compared to store-bought.
Recommended Product:
👉 Deep Self-Watering Planter Box for Onions and Other Bulb Vegetables
This planter ensures proper drainage and consistent moisture, perfect for growing onions and maximizing your harvest indoors or on a balcony.
Tips for Success
- Choose healthy onions with visible green shoots—not soft or moldy bulbs.
- Rotate your container occasionally for even sun exposure.
- Avoid overwatering, which can cause bulb rot.
- Plant multiple halves spaced at least 4 inches apart to allow room for growth.
Regrowing onions from sprouted bulbs is a budget-friendly way to keep your kitchen stocked with fresh, flavorful alliums. It’s a simple project that yields tasty rewards, whether you use the greens or wait for full bulbs
15. Peppers (Bell or Hot)
Peppers are vibrant, flavorful additions to many dishes, whether sweet bell peppers or spicy hot varieties. Regrowing peppers from seeds saved from your kitchen scraps is a fun and rewarding project that can fill your garden or windowsill with fresh, homegrown heat and color. While it may take a few months to mature, the payoff is worth the wait!
🌶️ How to Regrow Peppers from Seeds
- Save seeds from fully ripe peppers—choose firm, healthy fruit with vibrant color.
- Rinse the seeds thoroughly to remove any pulp, then lay them out on a paper towel to dry completely (this can take 2–3 days).
- Fill seed-starting trays or small pots with seed-starting mix, which is light and drains well.
- Plant the dried seeds about ¼ inch deep in the soil.
- Water gently but thoroughly to moisten the soil.
- Place the pots in a warm, sunny location (ideally 70–85°F) or use a seedling heat mat to encourage germination.
- Keep the soil consistently moist but not soggy.
Caring for Pepper Seedlings
- Seeds usually germinate in 7–14 days, but some varieties may take longer.
- Once seedlings sprout, ensure they get 12–16 hours of bright light daily, using grow lights if needed.
- When seedlings have 2–3 sets of true leaves, thin them out or transplant into larger containers.
- Peppers thrive in warm weather and lots of sunlight—make sure they get at least 6–8 hours of sun daily.
- Fertilize lightly with a balanced organic fertilizer every 2–3 weeks once plants are established.
Harvesting and Using Homegrown Peppers
- Depending on the variety, peppers typically take 60–90 days from seed to harvest.
- Harvest when peppers reach full size and color, slicing them fresh into salads, stir-fries, sauces, or for roasting.
- Hot peppers can be dried or pickled for longer storage.
- Fresh peppers grown at home often have brighter, more complex flavor than store-bought.
Recommended Product:
👉 Seed Starting Kit with Heat Mat and Grow Lights – Perfect for Starting Pepper Seeds Indoors
This all-in-one kit provides warmth and light for successful germination and healthy pepper seedlings, especially helpful if you’re growing in cooler climates or indoors.
Pro Tips for Growing Peppers from Scraps
- Start seeds indoors 8–10 weeks before the last expected frost date in your area.
- Harden off seedlings by gradually exposing them to outdoor conditions before transplanting.
- Peppers appreciate consistent watering but dislike soggy soil—water when the top inch feels dry.
- Use stakes or cages for taller varieties to support heavy fruit.
Regrowing peppers from seeds saved from kitchen scraps is an exciting way to grow your own fresh produce, control what goes into your food, and enjoy the satisfaction of gardening at home. It’s a perfect project for gardeners of all levels who want to spice up their meals sustainably.
Tips for Success When Regrowing Food at Home
Regrowing food from kitchen scraps is a fun and sustainable way to stretch your grocery budget and reduce waste. Whether you’re a beginner or seasoned regrower, these simple tips will help your plants thrive and keep your indoor garden flourishing.
1. Use Clean Water
Using fresh, clean water is one of the most important steps when regrowing plants in water. Stagnant or dirty water can lead to bacterial growth, mold, or rot, which will harm your scraps before they have a chance to root.
- Change the water every 1–2 days to keep it fresh and oxygen-rich.
- Use room-temperature water, as cold water can shock tender roots.
- If possible, use filtered or distilled water to avoid chemicals like chlorine that can inhibit growth.
- Rinse jars or containers thoroughly before refilling to prevent slime buildup.
2. Start with Healthy Scraps
The success of your regrowing project often depends on the quality of your starting scraps.
- Choose pieces that are firm, fresh, and free of mold or bruises.
- Avoid scraps that are wilted, overly dried out, or slimy.
- If regrowing from seeds (like peppers), select seeds from ripe, healthy fruit.
- Buying organic produce can sometimes improve your chances because these are less likely to be treated with growth inhibitors.
3. Be Patient
Regrowing plants takes time, and different foods grow at different speeds.
- Fast growers like green onions and lettuce can show new shoots in just a few days.
- Slower growers such as ginger, sweet potatoes, and peppers may take weeks or months to produce harvestable results.
- Keep in mind that regrowing is a marathon, not a sprint—consistent care pays off!
- Use this time to enjoy watching your plants develop and learn what they need to thrive.
4. Upgrade to Soil for Long-Term Growth
While many scraps can start in water, most plants will thrive better once they’re moved to soil.
- Once roots or shoots reach a few inches, transfer your plants to pots with well-draining, nutrient-rich soil.
- Soil provides essential nutrients, better support, and improved moisture control.
- Using pots with drainage holes prevents waterlogging and root rot.
- Make sure to place soil-grown plants in a sunny location or under grow lights for best results.
Bonus Tips:
- Monitor Light and Temperature: Most regrowing plants prefer bright, indirect sunlight and temperatures between 65–75°F (18–24°C).
- Avoid Overcrowding: Give each plant enough space to grow without competing for light and nutrients.
- Use Clean Tools: Always use clean scissors or knives when harvesting or trimming plants to prevent disease.
- Keep an Eye Out for Pests: Indoor plants can attract pests like aphids or fungus gnats; treat early with natural methods if needed.
Regrowing your own food scraps is a rewarding journey that combines gardening with sustainability. With these tips, you’ll boost your success and enjoy fresh, homegrown greens, herbs, and veggies from scraps you’d otherwise throw away.
Create a Kitchen Scrap Garden
Once you’ve tried a few regrowth projects, you can build your own kitchen scrap garden:
- Use windowsills for herbs and green onions
- Repurpose jars, mugs, or yogurt containers as mini pots
- Label each plant with its name and regrowth date
- Teach kids or roommates how to help care for it
You’ll end up with a sustainable, self-replenishing source of herbs and veggies right in your kitchen.
Foods That Don’t Regrow Well
Not every kitchen scrap is regrowable. Avoid trying to regrow:
- Tomatoes (they’re tricky from scraps—use seedlings instead)
- Cucumbers and zucchini (seeds from store-bought varieties often don’t sprout)
- Spinach or kale (you can’t regrow leaves from stems)
Stick with the tried-and-true foods you can regrow from kitchen scraps for the best results.
Final Thoughts: Grow More, Waste Less
Regrowing food from scraps is a small act with big impact. You save money, reduce kitchen waste, and enjoy the satisfaction of producing something useful from what would otherwise be trash.
Whether you start with green onions, celery, or basil, all you need is a little time, sunlight, and water. Once you experience the magic of watching something regrow, you’ll be hooked.
Keep Growing With These Resources:
- How to Grow Summer Veggies That Thrive in Heat
- How to Grow Microgreens in Your Kitchen
- How to Grow Potatoes Indoors
- How to Make DIY Fertilizer from Household Waste
Bottom line: The next time you reach for the compost bin, pause—and consider giving those scraps a second chance at life. With just a few containers and a little patience, you’ll discover that foods you can regrow from kitchen scraps are some of the easiest, cheapest, and most rewarding crops you’ll ever grow.